You can update inventory counts for all of your products in bulk through the Inventory Upload Mass Change tool.
To get started, go to More > Inventory & Services > Tools > Inventory Upload.
If you are using Vetcove, or if you prefer to manually update inventory counts for a product, see Inventory Counts for instructions.
Step 1: Download Template
Select Download All Inventory Counts to download a CSV file of inventory counts for the products active at your current location.
If your practice has a large product dataset, you can select Email All Inventory Counts to email the CSV file to any specified recipient. This helps prevent the system from timing out when downloading the file.
Step 2: Update Quantity in Stock
The CSV file includes essential details for each product (including name, type, units, and unit cost) and the quantity in stock for each product ID.
The only column that can be updated through the Inventory Upload Mass Change tool is quantity in stock.
-
Do NOT change any column headers. The Vetspire system requires the column headers to process your changes.
-
Do NOT change any product IDs in the first column. The Vetspire system uses these unique IDs to identify which products to update.
-
In the quantity in stock column:
-
Only positive numbers are supported. (You cannot enter a negative stock count.)
-
Do NOT leave the field blank. Enter a 0 (zero) if you do not have any stock for a product.
-
Symbols and special characters are not supported.
-
-
Save your file often when making several changes.
Step 3: Upload
Save the edited CSV file to your device. In Vetspire, select Choose File, then select the CSV from your file explorer. Select Upload & Update Counts!
The system may take several minutes to upload your changes. Do NOT leave the page while it is processing.
How do I know if my upload is successful?
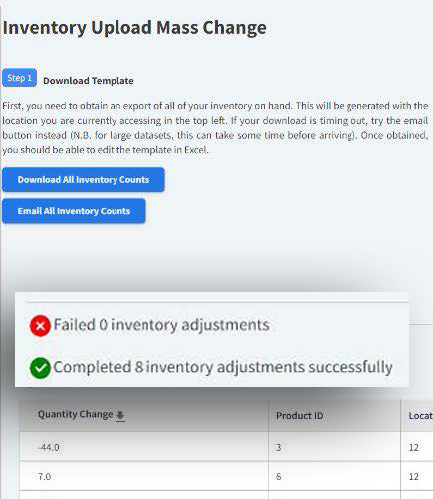
Once the stock count file is uploaded, a notification will indicate the numbers of Failed and Completed adjustments.
A completely successful upload will show FAILED 0 inventory adjustments and Completed # inventory adjustments successfully.
For any failed items, return to your edited CSV file in Excel and update the quantity in stock column to the correct figure(s). Upload the corrected CSV file in Step 3.