
Create New Codes
This section will detail the process for using the import process to generate new codes.
Download the Existing Vetspire File
Navigate to
More > Inventory & Services, scroll down to Tools and select Products Upload.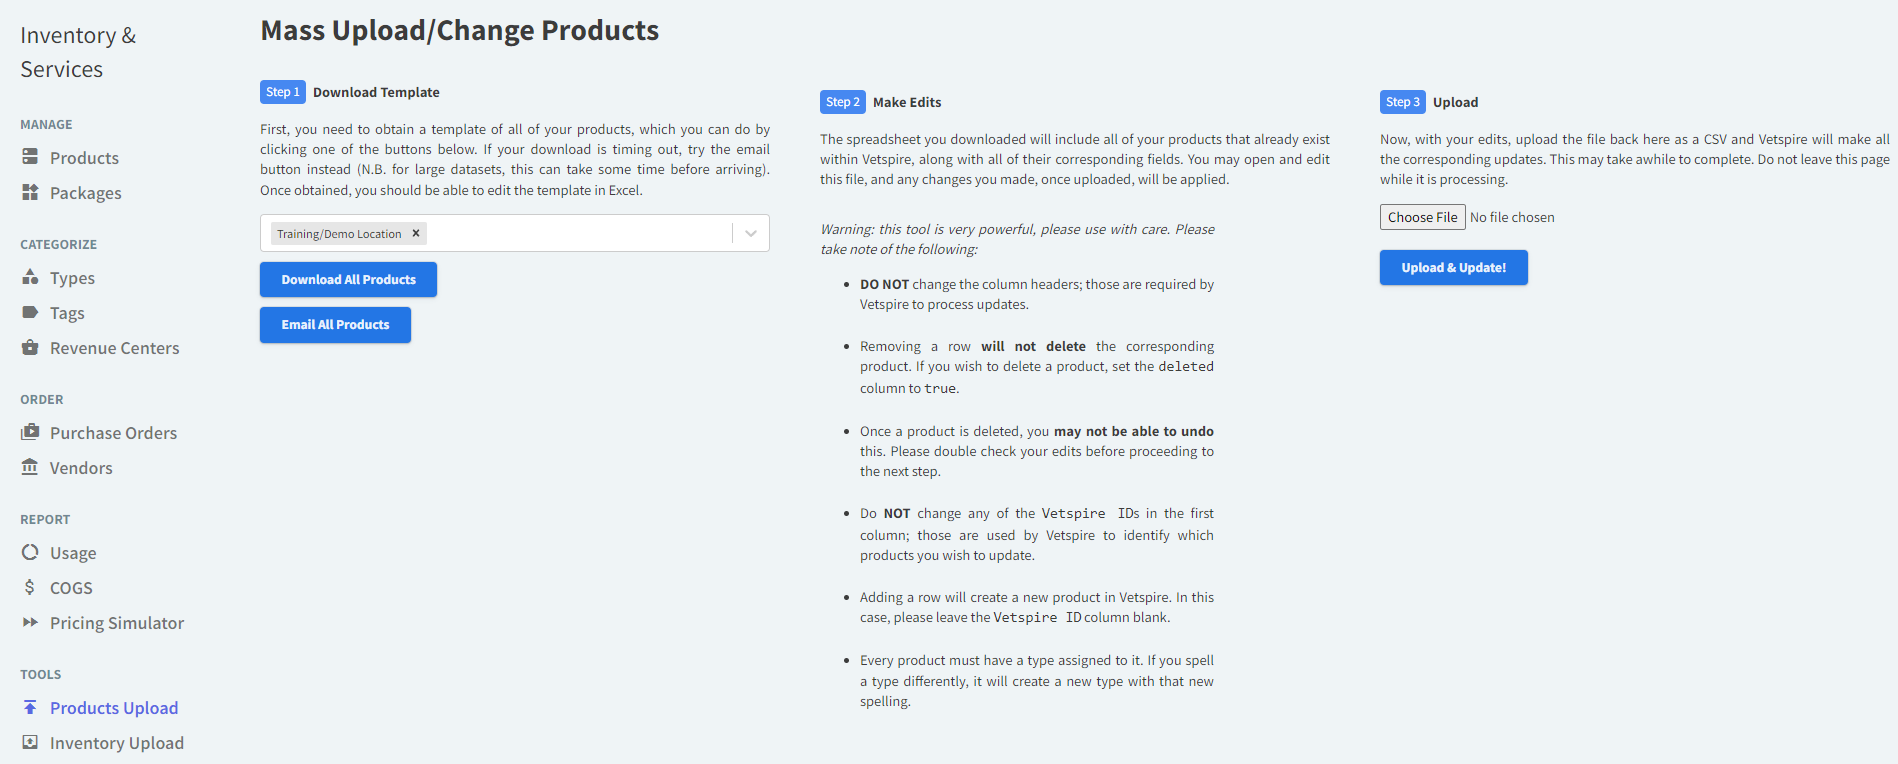
In the Filter to Locations box, enter the correct locations. Leave this field blank to select all locations.. NOTE: for new codes, the location does not matter.
Select Download All Products.
NOTE: IF YOU GET AN ERROR, THE FILE IS LIKELY TOO LARGE. TRY AGAIN USING “EMAIL ALL PRODUCTS”. THE FILE WILL BE EMAILED TO YOU IN LESS THAN 15 MINUTES. IF IT STILL DOES NOT WORK, CONTACT SUPPORT.
IMPORTANT: FROM THE TIME THE PRODUCT FILE IS DOWNLOADED UNTIL THE IMPORT IS COMPLETE, THERE IS A RISK OF OVERWRITING ANY CHANGE MADE TO VETSPIRE.
BEST PRACTICE: ENSURE ALL USERS STOP UPDATING PRICES OR MAKING CHANGES TO THE PRODUCT CODES WHILE WORKING ON THE IMPORT.
USERS MAY STILL INVOICE FOR PRODUCTS WITHOUT AFFECTING THE UPLOAD.
Edit the File
Remove all existing rows except the header row.
Enter values in the following fields. Refer to the Columns section for help with each of these columns:
Code (optional)
Name (required)
Type (required)
Selling Quantity (optional)
Buying Quantity (optional)
Unit Cost (optional)
Units (required)
Is Euthanasia (required)
Is Controlled Drug (required)
Is Neuter (required)
Coerce Integer Quantity (required)
Only Inventory (required)
Track Inventory (required)
Deleted (required): Should always be FALSE
Categories (required)
Leave the following fields blank:
Manufacturer ID
Historical ID
ALL Tax columns
ALL Enable columns
ALL Pricing columns
All Tag columns
If you do not want the codes enabled everywhere, add the disabled field and put TRUE in all cells.
Import the File
Navigate to
More > Inventory & Services,scroll down to the Tools section and select Products Upload.Select Choose File and locate the CSV file.
Select Upload & Update!
Once the file is successfully imported, check your work to ensure the changes came in successfully. This can be done by manually checking 4-5 products from the import.
Refer to the Troubleshooting section for tips if you get an error message.