Appointment Documentation
Begin Appointment
To start appointments from the schedule/calendar:
Select the scheduled appointment.
Click the Start Appointment button to open the patient chart.
The scheduled provider is assigned when an encounter is opened by selecting Start Appointment. This provider is seen at the bottom of the encounter.
Select a Provider
Select the pencil to edit the field and change the provider, add additional providers, or add a technician or scribe.
Begin typing to see a drop-down list of available providers and select the appropriate choices for the applicable fields.
EDIT THE PROVIDER AND TECHNICIAN AT ANY TIME.
Complete Appointment Documentation
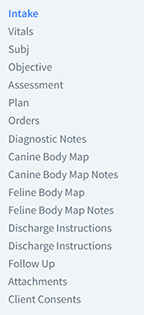
With the chart open, complete the documentation necessary for the patient visit. Navigate the patient chart through the left-hand toolbar.
Assessment (macros)
Order Labs button used for the Integrated Labs
Orders: Search for orders to add from the dropdown. Enter everything to invoice for this visit to create the medical chart, create the invoice, apply the appropriate packages, radiology, etc. note: creating an invoice from the billing tab will not populate the encounter.
Diagnostic Notes
Canine and Feline Body Maps
Encounter Templates
Customize the encounter templates and create as many templates as necessary. These templates may default to editable and frequently used language. Email support@vetspire.com to have a new encounter template created.
See the Macros section for information on creating and using a Macro. Use a Macro to complete any text box that is not a pop-out except Medication Instructions.
In any section in which you can write freely, you will notice that any symptom, diagnosis, or procedure is highlighted. This color-coding highlights anything medically interesting to stand out to your eye.
Navigate all sections of the encounter by using the heading on the left.
Some sections on an encounter will have some icons on the right-hand side of the column:
Print Label: prints a label with subjective information
Mark All Normal: makes all Normal/Abnormal questions normal
Mark All Not Examined: marks examinable items as Not Examined
Import: Pull all exam section information from the previous encounter. This is useful for rechecks to reference what was found on the last exam quickly. If the last exam were a different encounter type, the formatting of the previous encounter would also transfer. This action cannot be undone.
Add Note: Add a line for additional notes.
Copy Medications: lists all active medications with associated directions. Found in the Discharge Instructions section.


